Posted on March 7, 2014 by Dahlene
So a couple of weeks ago I ran across a video from Deb Valdor. She had a wonderful tutorial using the Envelope Punch Board to make a really cute bow. I decided to give it a try to this is what I came up with. I did not realize that the bow had stripes in it until now…he he any way I had fun doing it. If you would like to watch Deb’s tutorial you can see it here. I also wanted to do the inside of my card using some of the same paper as the outside. I also made the envelope to complete it. I have been purchasing 8×8 paper stacks so that I can make matching envelopes they are the perfect size for your A2 card size.
Thanks for checking in, Dahlene
The supplies used were:
White cardstock
Colorbok 8×8 Jewbox Designer Paper
Cutlebug Swiss Dots embossing folder
Flower Shop stamp set from Stampin Up
Pansy Paper from Stampin Up


Filed under: Blank Note Cards | Tagged: Pansy Punch, Stampin Up Flower Shop Stamp, Stampin' Up! Stamps, Tutorials | Leave a comment »
Posted on April 15, 2011 by Dahlene
 I sold one of my stamp set and I thought it would be fun to make a Thank You card to put into the package before I sent the set off to it’s new owner. It also gave me an excuse to use my new Blossom Punch that I got from Stampin Up. I tried for several weeks to decide what punch I wanted and finally decided on that one. I am now glad I did get it because of how versatile it is. I also bought the stamp set that goes with it but I have not had a chance to play with it. I hope you have a great day and Thanks for stopping by.
Filed under: Thank You | Tagged: Punches, Stampin' Up! Stamps | 1 Comment »
Posted on January 25, 2011 by Dahlene
 So this is my first Luminary and I thought it turned out great of course next time I will do some things different on it but number one I actually did it considering I had fallen and messed up my elbow which is now doing great and I was trying to do it under 45 minutes because I was trying to do the Splitcoaststamper’s VSN (Virtual stamping night) but I did not get a chance to upload it until today so I thought I would put it on my own blog. Boy that was some rambling on I just did. I am so excited because by doing the project I needed to get a picture of it while it was lit so I turned off all my lights but one that can step on with my foot to turn it on an off, anyway I got the camera just right then turned the light off with my foot and took the picture and for once I got a great picture showing the colors perfectly. I will be doing this from now on. lol
Anyway I used Stampin Up’s Real Red card stock, Wreath of Roses stamp set,Old Olive, Real Red markers and vellum to make this luminary. I also used my Nestablilites oval die. For the instructions on how to make the Luminary you can go Here I hope you all have a great day and thanks for checking in on me.
Filed under: 3D | Tagged: 3D Projects, Stampin' Up! Stamps | Leave a comment »
Posted on January 5, 2011 by Dahlene
 What a fun way to end the year by having a Grand daughter born on the 31st of December. I played around with an old Stampin Up set called Perfect Party and also used my Cricut Calligraphy Collection for the Happy Birthday. I added some Stickles to give it the added sparkle and gave it to her. She got a shopping cart and decided to use the card like she was going to buy it. I loved it and I know she loved it as well. I hope to get back into the routine of creating many more cards and 3 d projects. I hope you find what you are looking for and I am grateful that I can find what I am looking for on the many wonderful blogs out there. Have a great day!
Filed under: Birthday | Tagged: Birthday, Cricut, Stampin' Up! Stamps | Leave a comment »
Posted on August 10, 2010 by Dahlene
Several days ago I became friends with Dianne Sisneros on Facebook and asked if I could include her blog on my blog and she said yes. It is so nice when you meet new friends whether on the Web or in person and it means so much to me because I do not leave my home very much because of my health. As I was linking her blog to mine I noticed that she is offering up some blog candy so get on over to her site and try to get some. I hope you continue to find new friends now matter where and how you do it because you never know who you will meet. By the way leave a note that I sent you over to her blog please.
Thanks Dianne!
Filed under: Uncategorized | Tagged: Stampin' Up! Stamps | 1 Comment »
Posted on October 15, 2008 by Dahlene
Are you thinking of Christmas yet? I am, I guess I’m wanting to get a start on it because I will be doing cards for both my daughter and I. I hate to wait until the last minute to get a stack of them done, which most of the time I am doing them right up to Christmas. This year I decided to break in my Season of Joy stamp set. I have all ready had fun with it and have been making several different cards so my daughter can have a few to choose from.
Stamp Set: Season of Joy
Ink & paper: Real Red, Glorious Green, Whisper White
Red Ribbon & Xmas Red Stickles
Filed under: Uncategorized | Tagged: 3D Projects, Christmas, Season of Joy, Stampin' Up! Stamps | Leave a comment »
Posted on August 5, 2008 by Dahlene
I just wanted to say thanks to all of the wonderful little peeks from Stampin’ Up’s convention this last week. I would have loved to go but I don’t think I would qualify! First of all I am not a demonstrator but I love all the products and the numerous ideas and tutorials that you demonstrators have taken so much time to do for those like me. I was a demonstrator for about 6 months but had to quit for health reasons. I loved reading from so many of your blogs about convention here in Salt Lake City, UT and am proud to live so close. The bad news is I am on pins and needles to get the new catalog. It is like the Mervyns add-open, open, open, but in my case it is hurry, hurry, hurry. I know I will want everything in it! I guess I will need to be more patient.
Filed under: Uncategorized | Tagged: Stampin' Up! Stamps | 1 Comment »
Posted on July 30, 2008 by Dahlene
Posted on July 24, 2008 by Dahlene
 My husband bought me a fireproof safe so I can put all of my families geneology books, scrapbooks & journals in. I have been afraid that we might have a fire and we would lose the most important things of our lives which is our memories. I was in a fire about 10 years ago and just made it off the roof when the windows blew out and I have seen what a fire can do to the things you love. I have had a fear that it might happen again but I pray it won’t. Ok now it is time for the card. The swap I am in is doing birthday cards for August and I knew we will be gone camping so I needed to get them done before and I thought they turned out real fun for a guys birthday card. I pretty much used cardstock I had on hand but I did use the Lovely as a Tree Stampin’ Up stamp set. I printed the happy birthday using the Block Letters Tryout font.
Filed under: Uncategorized | Tagged: Lovely as a Tree, Stampin' Up! Stamps | 1 Comment »
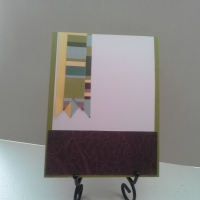
Posted on June 26, 2008 by Dahlene
 Hi everyone! I did not realize the pressure I was putting on myself trying to keep up with all of the fun bloggers out there. I was not able to work on my computer until yesterday because I put my back out and have been having a lot of Vertigo attacks. I am doing much better now Yahoo! This week I decided to make a thank you card using the WSC52 challenge. I love the colors and how they turned out together. See you again next week and Thanks for looking.
I used all Stampin Up products for this card. I used: Pretty Petals, Fun and Fast Notes, & Boho Background stamp sets, Whisper White, Bashful Blue, Always Artichoke, & Not Quite Navy CS. Clear embossing powder, Always Artichoke & Not Quite Navy, Versamark ink. White Signo pen, White Grosgrain Ribbon, Mat Pack, Crytal Effects, 1 3/8″ circle punch and Scallop punch.
Filed under: Scallop Punch | Tagged: Boho Background, Fun & Fast Notes, One of a Kind, Stampin' Up! Stamps | 1 Comment »


